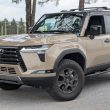


Automotive shots like the one featured above are in vogue these days. Without knowing the technique you might figure it’s achieved using Photoshop’s blur tool or that the photographer was riding shotgun on a magic carpet. We’re going to show you how.
Ask any photographer who takes rig shots and they’ll tell you there’s still quite a bit of post processing to be had. The examples in this article belong to photographer, Theo Civitello. To accomplish a shot like this a camera rig is used. Essentially a camera rig is a long pole with a camera mount on one end and the other end is affixed to the vehicle via heavy duty suction cups. The setup is not an easy task and may take more time to mount than to actually shoot. Having an extra set of hands can be priceless.

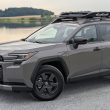
After the camera is mounted and pointed in the right direction, a slow shutter speed should be set and the picture should be taken while the car is rolling. When we say rolling we suggest rolling at a slow speed to reduce vibrations and chances of damaging equipment. Use the sharpest aperture for your lens and decrease the shutter speed to get a nice blur. The longer the camera shutter is open the greater the background blur in your image. This might be a good time to mention that we at RFD take no responsibility for damages from attempting these rig shots.

The results when patience and skillful techniques of post processing are applied can be breath taking. Be sure to remove all reflections and traces of the rig during your post processing.

So what we’ve learned is that to create shots like this you need a long pole. Can I get a Giggity?
Seriously, don’t be intimidated. Buy a camera rig and get out there! You’ll never know your potential until you put forth the effort.
